Piniy

Monday, June 29, 2015

Pineapple Upside Down Cake

upside down pineapple cake
Pineapple Upside Down Cheesecake
 
Junior's Cheesecake With Cracker Crust
Ingredients
  • Cheesecake
  • Crust:
  • 1 1 /2 c. graham cracker crumbs
  • 1 T sugar
  • 6 T melted butter
  • Cheesecake:
  • Four 8-ounce packages PHILADELPHIA cream cheese, at room temperature
  • 1⅔ cups sugar
  • ¼ cup cornstarch
  • 1 tablespoon pure vanilla extract
  • 2 extra-large eggs
  • ¾ cup heavy whipping cream
Instructions
  1. Crust:
  2. Combine all ingredients and press into a 9 inch springform pan.
  3. Bake at 350 for 8 minutes. Let cool.
  4. Cheesecake:
  5. In a large bowl, using an electric mixer fitted with the paddle attachment, beat 1 package of the cream cheese, ⅓ cup of the sugar, and the cornstarch together on low until creamy, about 3 minutes, scraping down the bowl several times.
  6. Blend in the remaining cream cheese, one package at a time, beating well and scraping down the bowl after each.
  7. Increase the mixer speed to medium and beat in the remaining sugar, then the vanilla.
  8. Blend in the eggs, one at a time, beating well after each.
  9. Beat in the cream just until completely blended.
  10. The filling will look light, creamy, airy, and almost like billowy clouds. Be careful not to overmix! Gently spoon the batter over the crust. Wrap the sides of the pan in aluminum foil.
  11. Place the cake pan in a large shallow pan containing hot water that comes halfway (about 1 inch) up the side of the springform. Bake until the edge is light golden brown, the top is light gold, and the center barely jiggles, about 1¼ hours. If the cake still feels soft around the edge, let it bake for 10 minutes more (the cooking time will be about the same for both the 8- and 9-inch cheesecakes). Remove the cheesecake from the water bath, transfer to a wire rack, and let cool for 2 hours. Chill until cold.
  12. Cheesecake recipe adapted from Junior's

Pineapple Upside Down Cake
 
Ingredients
Topping
  • ¼ cup butter, melted
  • ½ cup packed light brown sugar
  • sliced pineapples (8 canned slices)
  • 15-20 maraschino cherries
Cake
  • 1 and ⅔ cups flour
  • ½ teaspoon baking powder
  • ¼ teaspoon baking soda
  • ½ teaspoon salt
  • ½ cup butter, melted
  • ¾ cup packed light brown sugar
  • ¼ cup granulated sugar
  • 1 large egg
  • ¾ cup milk
  • ½ cup pineapple juice
  • 1 Tablespoon vanilla
Instructions
  1. Preheat oven to 350°F
  2. Prepare topping first:
  3. Place ¼ cup of melted butter into a 9-inch cake pan
  4. Sprinkle the brown sugar on top.
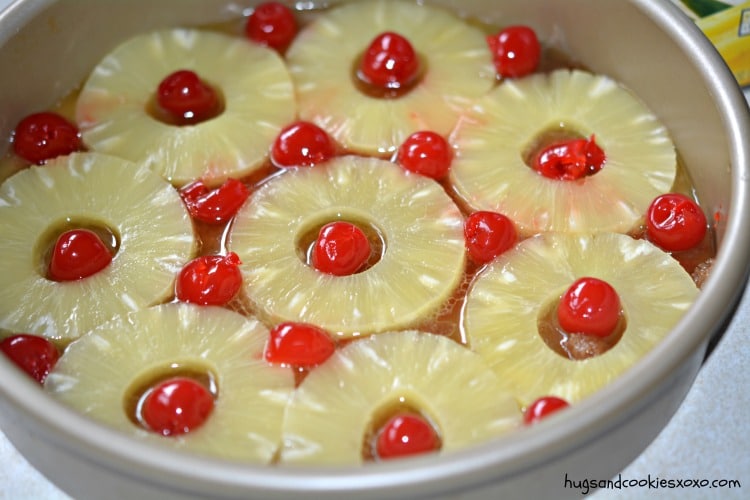
  5. Lay pineapple slices on top and add cherries in the spaces!
Cake
  1. In a microwave-safe bowl, melt the butter.
  2. Whisk in the sugars.
  3. Whisk in the egg, milk, pineapple juice, and vanilla.
  4. Add dry ingredients and whisk to remove lumps.
  5. Pour batter into the pan on top of the pineapples.
  6. Bake for at 20 minutes and then loosely tent with foil to prevent browning.
  7. Bake an additional 20-25 minutes until a toothpick comes out clean.
  8. Let cool completely and use a HUGE spatula to transfer this on top of your cheesecake.
  9. Chill until cold!

Saturday, June 27, 2015

How fresh are your Eggs the Queen of Clean tells you

Quite honestly eggs and their freshness have always been a mystery to me. I know how to test an egg for freshness, ( and I share it with you here) but I always question the "sell by" date and I am sure that I toss eggs when they could still be used. Here's everything and more that will help you judge how fresh your eggs are.
How fresh are your eggs?
The freshness of an egg is not only determined by the date when the egg was laid, but also by the way the egg has been stored. Proper handling and storage is perhaps the most important factor in determining freshness.
If a freshly laid egg is left at room temperature for a full day, it will not be as fresh as a week old egg that has been refrigerated between 33° and 40°F. from the time it was laid.
According to the U.S. Dept. of Agriculture (USDA):
Many eggs reach stores only a few days after the hen lays them. Egg cartons with the USDA grade shield on them, indicating they came from a USDA-inspected plant, must display the 'pack date' (the day that the eggs were washed, graded, and placed in the carton). The number is a three-digit code that represents the consecutive day of the year (the 'Julian Date') starting with January 1 as 001 and ending with December 31 as 365.
Sell By Date -
Though not required, most egg cartons also contain a "sell by" date beyond which they should not be sold. In USDA-inspected plants (indicated by the USDA shield on the package), this date can't exceed 30 days beyond the pack date which is within USDA regulations.
Always purchase eggs before their "sell by" date. Information from the Georgia Egg Commission:
Julian Date:
Starting with January 1 as number 1 and ending with December 31 as 365, these numbers represent the consecutive days of the year. This numbering system is sometimes used on egg cartons to denote the day the eggs are packed. Fresh shell eggs can be stored in their cartons in the refrigerator for 4 to 5 weeks beyond this date with insignificant quality loss.
Expiration Date:
The "sell by" or "best if used by" or "exp (date)" are all expressions used by the industry in various states, and are used by the retailer to assure you of freshness. The egg will continue to be fresh for at least another 2-3 weeks if it has been refrigerated from the time packed until used at 45 degrees F. or lower. As the egg ages, it does lose some of its qualities, so if you were baking a cake or whipping meringue, your cake might not rise as high as expected, and you might not get the volume of meringue you would expect, so for baking purposes it is better to use a fresher egg.
How long are eggs good after the sell date?
Refrigerated raw shell eggs will keep without significant quality loss for about 4 to 5 weeks beyond the sell date or about 3 weeks after you bring them home.
A general rule to follow is that any egg that looks or smells odd should NOT be used. Just crack each egg in a small bowl, smell it - your nose will tell you! 
How to test if an egg is fresh:
First Method:
Fill a deep bowl with water and carefully lower the egg into the water. A very fresh egg will immediately sink to the bottom and lie flat on its side. This is because the air cell within the egg is very small. The egg should also feel heavy.
• As the egg starts to lose it freshness and more air enters the egg, it will begin to float and stand upright. The smaller end will lie on the bottom of the bowl, while the broader end will point towards the surface. The egg will still be good enough to consume.
• However, if the egg fully floats in the water and does not touch the bottom of the bowl at all, it should be discarded, as it will most likely be bad.
Second Method:
Test the eggs freshness by breaking the egg onto a flat plate, not into a bowl. The yolk of a very fresh egg will have a round and compact appearance and it will sit positioned quite high up in the middle of the egg. The white that surrounds it will be thick and stays close to the yolk.
• A less fresh egg will contain a flatter yolk, that may break easily and a thinner white that spreads quite far over the plate.
Photo from COOK IT QUICK!, University of Nebraska Cooperative Extension

Friday, June 26, 2015

Remove Rust Queen of Clean

EASY WAYS TO REMOVE RUST
Sooner or later all of us find rust on something and try to remove it. It won’t respond to bleach, normal pre-spotters and soaking. Here’s some natural and some not so natural ways to deal with it.
RUST ON WHITE CLOTHES: Apply lemon juice to the rust and let sit in the sun, then launder as usual. This is generally safe for all washable fabrics. If in doubt, test in a small area first. It can also be used on color fast clothes. Again, if in doubt test first. 
Another method is to apply Cream of Tartar to the rust spot, gather up the edges of the material and dip the spot into hot water. Let sit about 5 minutes and then launder as usual. 
RUST ON METAL: Sprinkle Bar Keepers Friend Cleanser on a cork and then rub the stain. Wash and rinse as usual.
REMOVING RUST FROM FIXTURES: On faucets and other fixtures, rub the spot with lemon and salt until it disappears. Rinse well and polish dry.
REMOVING RUST FROM THE TOILET BOWL: There are, of course, acid bowl cleaners available, but for a safe, inexpensive way to remove rust try this. Once a month sprinkle a layer of Tang Breakfast Drink or Lemon Kool-Aid on the sides of the toilet and in the water. Leave for an hour and then brush and flush.
REMOVING RUST FROM CHROME: Simply rub the rust with a crumpled ball of aluminum foil until it disappears. It also works well for chrome on cars, bikes, etc.
RUST ON COUNTERTOPS: Use this on Formica™, plastic laminates etc. Make a paste of Cream of Tartar and lemon juice or hydrogen peroxide, apply to the rust and allow to sit for about 30 minutes. Scrub with a nylon scrubbing sponge and rinse. Reapply of needed.
RUST ON POOL DECK AND TILE: Moisten the area and apply Bar Keepers Friend Cleanser. Let sit for a few minutes then rub with a paper towel. Rinse well.
BUY and TRY:
If you are looking for a commercial rust remover, try WHINK Rust Remover, Rust Magic of Magica Rust Remover. Look for them at some grocery stores, home centers and hardware stores. Remember to use only as directed to prevent damage to you or the surface you are working on. Keep out of reach of children.

The History of the Middle Finger

The History of the Middle Finger:
Well, now......here's something I never knew before, and now that I know it, I feel compelled to send it on to my more intelligent friends in the hope that they, too, will feel edified. 
Before the Battle of Agincourt in 1415, the French, anticipating victory over the English, proposed to cut off the middle finger of all captured English soldiers. Without the middle finger it would be impossible to draw the renowned English longbow and therefore they would be incapable of fighting in the future. This famous English longbow was made of the native English Yew tree, and the act of drawing the longbow was known as 'plucking the yew' (or 'pluck yew'). 
Much to the bewilderment of the French, the English won a major upset and they began mocking the French by waving their middle fingers at the defeated French, saying, See, we can still pluck yew! Since 'pluck yew' is rather difficult to say, the difficult consonant cluster at the beginning has gradually changed to a labiodentalfricative 'F', and thus the words often used in conjunction with the one-finger-salute! It is also because of the pheasant feathers on the arrows used with the longbow that the symbolic gesture is known as 'giving the bird.' 
And yew thought yew knew every plucking thing. Didn't yew!!

Thursday, June 25, 2015

Onion Bombs

Onion Bombs ( : and they are; The Bomb!:)
2 large onions
1 pound extra lean ground beef
1 tsp garlic powder
1 tsp onion powder
1 Clove of Garlic
2 Tb BBQ Sauce
1 egg
1/2 C fresh bread crumbs
1 tsp salt
1/2 tsp pepper
( you can prep this like your favorite meatloaf recipe)
Wash Hands
Cut the both end off the onions, set them on one cut end, then cut in half. Peel the onion and separate into matching pieces.
In a bowl, mix together all the remaining ingredients with hands Fill both matching sides of the onion then press them together, wrap them twice in foil and set aside.
To cook, place them in a large amount of very hot coals for 15 minutes, flip over and cook for another 15 minutes. Total cooking time will depend on the size of your bombs and the hotness of your coals so check on them to be sure they are cooked all the way through. If you prefer you may do these on your grill You could also roast these in a 350 degree oven if you are not camping!
Remove the foil and top with a sauce of your choosing if desired. I served with Garlic Rice Primavera.~

╔═══════════ ೋღ ღೋ ═════════╗
☆ Thank you all for passing my things around and sharing ☆
☆ 

Laminate Floor Cleaner
Environmentally friendly, no harsh chemicals! We tried the expensive cleaners and found our floors still looked streaky and dull. This homemade cleaner makes them look bright, streak free and shiny

Recipe:
1⁄2 cup vinegar
1 gallon water
Mix vinegar and water and mop floors as usual.

Tuesday, June 23, 2015

Healthy earth Scrub from Queen of Clean

I want to share an awesome natural cleaner that you can make up easily at home. It will replace your all- purpose cleaners and cleansers for use in the bathroom and kitchen. 
HEALTHY EARTH SCRUB
• 1-1/3 cup Baking Soda
• 1 cup Dr. Bonners Castile Soap (any fragrance)
• 1/3 cup water
• 1 – ½ Tablespoon White Vinegar
Combine and put in your favorite container. A squirt top container works well. You can also use a plastic container with a snap on lid. Use on any hard surface except for wood. If it gets thick simply thin with water or castile soap. Buy Dr. Bonners at drug stores and health stores.
Great on Stoves, ovens, cook tops, sink, faucets, tubs, showers and even shower doors.
If it gets stiff over time, add a little more water or a little more vinegar to it. Be sure you cover it tightly to keep it moist.

Monday, June 22, 2015

Copy CAt Red Lobster Chedder Biscuits

Copycat Red Lobster Cheddar Bay Biscuits in 20 Minutes
makes approximately 18 biscuits

2 cups all-purpose flour
1 Tbsp baking powder
1 Tbsp granulated sugar
1 Tbsp garlic powder
¾ teaspoon kosher salt, divided
1 ½ sticks (¾ cup) unsalted butter (divided)
1 cup whole milk
1 (8 oz) package shredded mild cheddar cheese
½ teaspoon dried parsley

Preheat oven to 450°F.  Line a baking sheet with parchment paper.  Add 1 stick (½ cup) of butter to a small microwave safe mixing bowl.  Microwave for 30 seconds or until butter is melted.  Set aside.

In a large mixing bowl combine flour, baking powder, sugar, garlic and ½ tsp salt.  Whisk until well combined.  Add melted butter and milk and whisk just until flour is all wet, do not over mix.  Add cheese and fold in with a spoon.

Drop heaping spoonfuls onto baking sheet.  Bake for 10-12 minutes, until biscuits are golden brown.

Meanwhile melt remaining ½ stick (¼ cup) of butter in small mixing bowl.  Microwave for 30 seconds or until butter is melted.  Add ¼ teaspoon salt and parsley.  Stir with pastry brush.

Remove biscuits from oven, brush with melted butter mixture.  Serve and enjoy!

Healthy Chocolate Pudding

rawchocolatepudding
Chocolate pudding is one of my favorite sweet treats but I haven’t been eating it very often these days because, let’s face it, it’s usually loaded with sugar and starch. I discovered a whole new way to make pudding that’s not only delicious, it’s completely healthy and Paleo friendly. I made up a batch of this yesterday and it absolutely satisfied my chocolate craving. Bonus… It’s so healthy it could pass for breakfast!
for 2 servings of healthy chocolate pudding:
1/4 cup shelled sunflower seeds
3 Tablespoons unsweetened, dark cocoa powder
1 ripe avocado, peeled and pitted
1 and 1/2 large bananas, peeled and frozen and cut into chunks
2 Tablespoons raw honey
1/4 teaspoon cinnamon
1/8 teaspoon nutmeg
pinch of sea salt
2 Tablespoons sweetened or unsweetened vanilla almond milk
Place sunflower seeds in a small bowl and cover them with water. Soak seeds for 1 hour. Drain seeds and place them, along with all of the other ingredients, in the bowl of a food processor. Pulse until completely smooth.
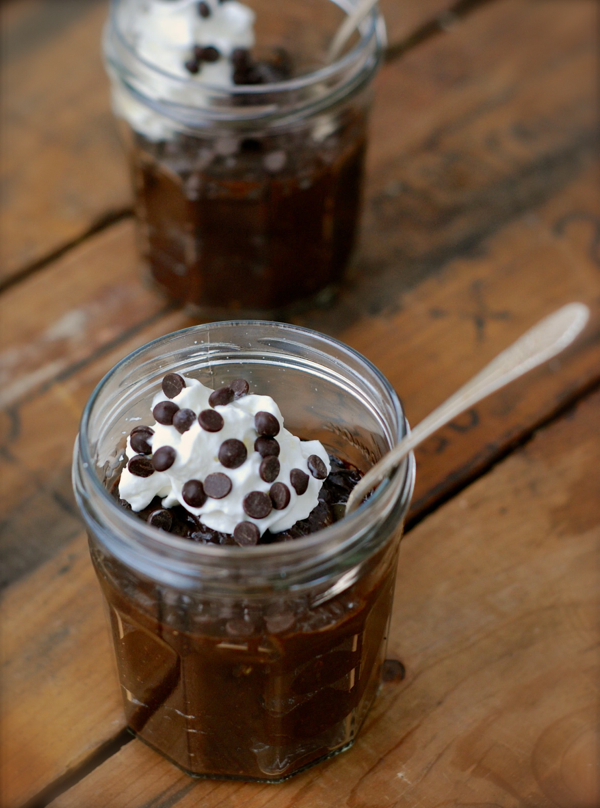
Scoop into 2 wide-mouth jelly jars or dessert cups. Top with honey-sweetened whipped cream and a few Paleo chocolate chips.
Enjoy!
~Melissa

Cleaning with things from your pantry

CLEANING WITH THINGS FROM YOUR PANTRY
KETCHUP: This is a great cleaner for copper. Simply work it in with a paper towel. Let it sit a few minutes, rub until you see the copper shine and then rinse well. 
DRY MUSTARD: It’s a great odor remover for plastic storage bowls. Fill the bowl with warm water, add about ½ teaspoon or so or dry mustard and let soak a few hours. Wash, rinse and dry. If you have onion or garlic smell on your hands work dry mustard into wet hands. Rinse and dry.
FLOUR: You can use dry flour on a dry stainless steelsink to polish it. Sprinkle in the flour and rub firmly with a paper towel. Rinse and dry well.
LEMON JUICE: Mix some lemon juice with cream of tartar and apply to stained countertops or breadboards. Let sit an hour or so or even overnight and then rinse and dry. Light stains can be wiped away immediately with this combination. Do not use on stone.
ONION: If you have brown stains on knifes from tomato products or the dishwasher, stick them into an onion. Let sit for a while the then pull out, rub the stain, wash and dry.
SALT: Pour it on spills or run-overs in the oven to absorb grease. 
VODKA: Swish diamond jewelry in undiluted vodka to clean. For heavily soiled pieces let soak 15 minutes. May be used on gold and hard stones.

Sunday, June 21, 2015

Chocolate cake using Bananas

Chocolate Monkey Snack Cake
 
Prep time
Cook time
Total time
 
A delicious snack cake great for using up those ripe bananas. Since it's a "snack", why not have two pieces?
Author: 
Recipe type: Dessert
Serves: 6 to 10
Ingredients
  • (adapted from Betty Crocker)
  • Ingredients
  • •2 very ripe bananas
  • •1/3 cup vegetable oil
  • • ⅓ cup water
  • •1 tsp. instant coffee granules
  • •1/2 tsp. vanilla extract
  • •1/2 tsp. apple cider vinegar
  • •1 and ¼ cups flour
  • •3/4 cup sugar
  • •1/4 cup dark cocoa powder (I use rich, dark, Dutch-processed)
  • •1/4 tsp. kosher salt
  • •1 tsp. baking soda
  • •1/3 cup milk chocolate chips
  • •1/3 cup semi-sweet chocolate chips
Instructions
  1. Preheat oven to 350°. In a large bowl, mash the two bananas well with a fork. Stir in oil and water. In a small bowl, mix instant coffee granules with vanilla extract and vinegar and add to banana mixture. Add the flour, sugar, cocoa, salt, baking soda and mix until combined. Mix the milk chocolate chips and semi-sweet chips together in a small bowl. Add ⅓ cup of chips to batter and stir until just combined. Pour batter into an ungreased 8 x 8-inch pan. Sprinkle remaining ⅓ chips on top of batter. Bake for about 33-38 minutes until a toothpick inserted in the center comes out clean. Cool slightly (about 10-15 minutes) before serving. We prefer it warm.
  2. Enjoy! ♥

Banana Cake


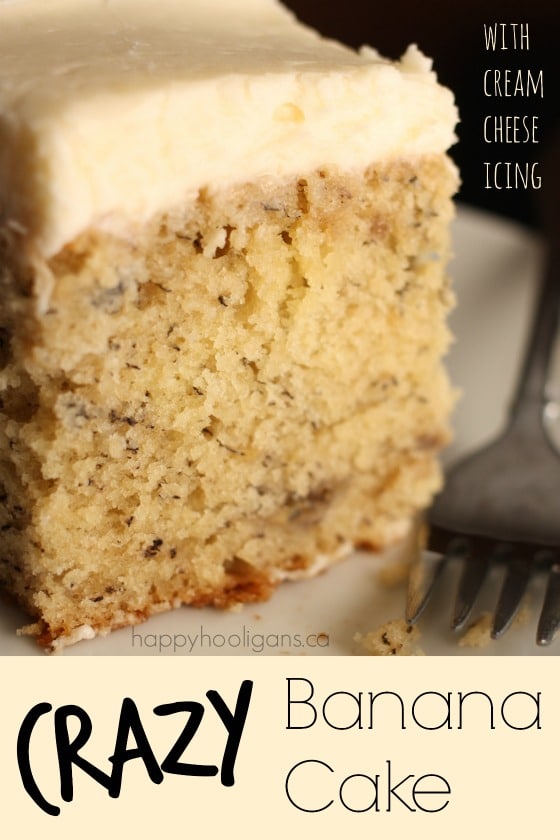
CRAZY BANANA CAKE WITH CREAM CHEESE ICING
The richest, moistest banana cake you'll ever make!
Author: 
INGREDIENTS
  • Cake:
  • 1.5 cups very ripe bananas (3 fresh bananas or 4 thawed, previously frozen bananas)
  • 2 tsp lemon juice
  • 3 cups all-purpose flour
  • 1.5 tsp baking soda
  • ¼ tsp salt
  • ¾ cup soft butter
  • 2 cups sugar
  • 3 eggs
  • 2 tsp vanilla
  • 1.5 cups buttermilk (OR milk soured with one tbsp vinegar or lemon juice)
  • Icing:
  • ½ cup softened butter
  • 8 oz cream cheese, room temp.
  • 1 tsp vanilla
  • 3.5 cups icing sugar (also known as powdered sugar or confectioner's sugar)
INSTRUCTIONS
  1. Pre-heat oven to 275 F, and grease and flour (or spray), a 9x13 cake pan.
  2. Mash banana and mix with lemon juice and set aside.
  3. In a med bowl, mix flour, baking soda and salt. Set aside.
  4. If you're making your own buttermilk, combine milk and vinegar (or lemon juice) in a small bowl, and set aside.
  5. In a large bowl, cream butter and sugar.
  6. Beat in eggs, one at a time. Stir in vanilla.
  7. Beat in flour mixture alternately with buttermilk.
  8. Stir in bananas.
  9. Pour into cake pan and bake 1 hour and 10 mins (or until knife comes out clean). *if need be, cook longer, checking every 10 minutes until cake is fully cooked.
  10. Immediately place in freezer for 45 minutes. (if not completely cool upon removal from freezer, let cool further before icing).
  11. Cream butter and cream cheese.
  12. Beat in vanilla and icing sugar on low until combined, then high until smooth.
  13. Frost cake and enjoy!

Saturday, June 20, 2015

Buttermilk Pie

~ buttermilk pie ~
This is considered an old Southern “hard times” pie. It’s made with simple ingredients and it’s pure heaven. Jeff and Gracie just love it, and it’s fantastic served at room temperature or chilled.
1 prebaked 9-inch pie shell
2 Tablespoons all-purpose flour
1 and 1/4 cup sugar
1/4 teaspoon salt
1 stick (1/4 pound) unsalted butter
3 large eggs
1 cup buttermilk
1 teaspoon pure vanilla extract
1/4 teaspoon freshly ground nutmeg
Bake pie crust at 350 for 15 minutes. Remove from oven and place on a baking sheet to cool a bit while you mix up the other ingredients. Keep the oven on.
Blend flour with sugar and salt, whisk in the melted butter (that is liquified but not sizzling. If it’s really hot, let it cool a bit before whisking in.) Beat the eggs and whisk them in. Add the buttermilk, vanilla and nutmeg. Pour into the baked pie shell. Slide the pie, still on the baking sheet, into the oven on a rack that has been placed in the lower third of the oven. Bake for 50-60 minutes at 350, or until a knife inserted in the pie comes clean. The center of the pie will still be a bit jiggly but will set up when cool. Cool on a wire rack.
Enjoy!
~Melissa